
Table of Contents
- Why a Proper Patio Sub-Base Matters
- What You’ll Need Before You Start
- Step 1: Clear and Level the Ground
- Step 2: Determine the Right Patio Sub-Base Depth
- Step 3: Choose and Lay MOT Type 1 for Patios
- Step 4: How to Compact a Patio Sub-Base
- Step 5: Create Patio Sub-Base Fall and Drainage
- Common Mistakes to Avoid
- Frequently Asked Questions
Last Updated: 11 October 2026
Why a Proper Patio Sub-Base Matters
A solid patio sub-base is the foundation of any durable outdoor surface. Without it, your patio will shift, crack, and sink within months. Most homeowners underestimate how critical this step is.
Countless patios fail because the sub-base is rushed or skipped entirely. The ground underneath looks flat to the eye, so many people assume it’s ready. It rarely is. Soil compacts unevenly, contains debris, and shifts with weather changes.
The patio sub-base depth and quality determine whether your investment lasts 20 years or 2. Proper preparation prevents water pooling, frost heave damage, and the expensive repairs that follow.
At Finescape Landscaping & Paving Ltd, we treat sub-base preparation as seriously as the patio itself. The best Porcelain & Natural Stone Paving won’t save a weak foundation. Here’s exactly how to prepare a patio sub-base correctly.
What You’ll Need Before You Start
Tools and Equipment
You’ll need specific equipment to prepare the ground properly. Hiring these tools is far cheaper than fixing a failed patio later.
Essential tools include:
- A spade or shovel for excavation and levelling
- A wheelbarrow to move soil and materials
- A spirit level to check for falls and slopes
- A measuring tape to verify depth and dimensions
- A plate compactor (vibratory compactor) for compacting the sub-base
- A garden rake to spread and level materials
- Work gloves and safety boots
- A garden fork for breaking up compacted soil
A plate compactor is non-negotiable. Hand tamping won’t achieve the density needed. Most hire shops rent them daily or weekly at reasonable rates.
Materials and Sub-Base Options
The material you choose affects drainage, durability, and cost. MOT Type 1 is the industry standard for patio sub-bases in the UK.
MOT Type 1 is a recycled crushed limestone and granite mixture. It compacts firmly, drains well, and binds together naturally. It’s the most reliable choice for patio sub-bases.
Other materials include:
- Hoggin: A natural mix of gravel and clay. Less reliable than MOT Type 1 because clay content varies.
- Sharp sand: Sometimes used as a final levelling layer, never as the main sub-base.
- Recycled asphalt: Acceptable in some cases, but MOT Type 1 performs better.
- Slate or gravel: Poor compaction properties. Not recommended for patios.
For most residential patios, order MOT Type 1 in bulk. Calculate volume by multiplying area (length × width) by depth in metres, then converting to tonnes. Your supplier can advise on quantity.
Step 1: Clear and Level the Ground
Start by removing all surface vegetation, turf, and debris. This includes grass, weeds, roots, and any old paving material.
Use a spade to strip back the turf. For large areas, a turf cutter makes this faster. Remove at least 150mm of soil to create space for the sub-base and paving layers.
Once cleared, check the ground level. Use a spirit level across the area. Mark any high spots or dips. These irregularities must be addressed now.
Break up compacted soil with a garden fork. Loosen the bottom 100mm so water can drain beneath the sub-base. Don’t leave hard clay or compacted ground underneath, it traps water and causes problems later.
Remove any stones larger than 50mm. These create voids in the compacted layer and prevent proper binding.
Step 2: Determine the Right Patio Sub-Base Depth
The patio sub-base depth depends on soil type and how the patio will be used. Most residential patios need 100-150mm of compacted MOT Type 1.
For domestic use on stable soil, 100mm is usually sufficient. On clay or soft ground, increase to 150mm. For areas that will bear heavy loads (parking spaces or commercial use), use 150-200mm.
Add an extra 50mm if your soil is particularly wet or drains poorly. Standing water beneath a patio accelerates deterioration.
The depth you excavate must account for both the sub-base and the paving layer above. If you’re laying 50mm of paving on 100mm of sub-base, excavate 150mm total.
Step 3: Choose and Lay MOT Type 1 for Patios
MOT Type 1 for patios should be spread evenly across the prepared ground. Order slightly more than your calculation suggests to account for settling.
Spread the material in 50mm layers. This prevents uneven compaction. Rake each layer level before adding the next. Use your spirit level frequently to maintain the correct slope.
Compact each layer as you go. Don’t wait until all material is spread. Partial compaction between layers creates better binding and density.
For a 100mm sub-base, lay two 50mm layers. For 150mm, lay three layers. This staged approach takes longer but produces superior results.
Dampen the material lightly before compacting. Dry material compacts poorly. Wet material compacts too easily and doesn’t bind. Aim for slightly moist.
Step 4: How to Compact a Patio Sub-Base
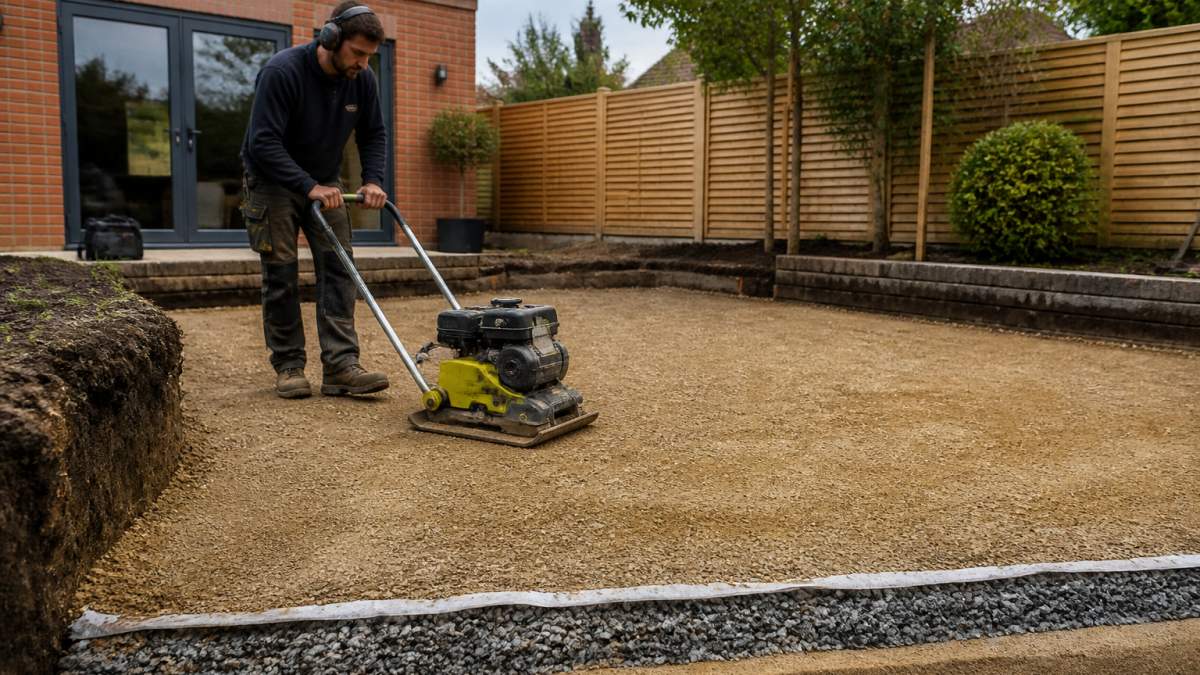
Compaction transforms loose stone into a solid, load-bearing layer. A plate compactor vibrates and forces particles together, creating density and binding.
Start at one edge and work systematically across the area. Make overlapping passes. Each pass should overlap the previous one by about 150mm to ensure complete coverage.
Make multiple passes until the material stops settling visibly. Typically, three to five passes per layer achieves good compaction. The material should feel firm and resist further movement.
A properly compacted patio sub-base will support your weight without shifting. It won’t crack underfoot or settle noticeably.
Check the level frequently. The compacted surface should match your planned fall (see Step 5). Adjust as needed before moving to the next layer.
Step 5: Create Patio Sub-Base Fall and Drainage
Water drainage is critical. Without proper fall, water pools on the patio surface and seeps into the sub-base, causing frost damage and deterioration.
Create a fall of 1:80 across the patio. This means a drop of 12.5mm per metre of length. For a 4-metre patio, the fall is 50mm total.
Mark your fall before compacting. Use pegs or a laser level to guide you. The high point should be near buildings or boundaries. Water should drain away from structures.
Use the spirit level to check fall as you compact. Adjust the material level if the slope isn’t correct. It’s easier to fix during preparation than after paving.
Ensure water drains away from the patio entirely. Poor drainage creates standing water at the edges, which accelerates deterioration and creates muddy areas.
Consider Drainage & Groundworks for patios in low-lying areas or on clay soil. Professional drainage solutions collect water and channel it away from the sub-base, protecting your investment long-term.
Common Mistakes to Avoid
Most patio failures trace back to sub-base mistakes. Recognising these problems helps you avoid them.
Skipping or rushing excavation: Some people don’t remove enough soil or leave old material underneath. This creates an unstable base. Remove all turf and break up compacted ground.
Insufficient compaction: Loose material settles over time. Use a plate compactor and make multiple passes. Don’t skip this step.
Wrong material: Using gravel, sand, or recycled asphalt instead of MOT Type 1 leads to poor compaction and drainage problems. Stick with MOT Type 1.
Ignoring drainage: Flat or reverse-sloping sub-bases trap water. Always create a 1:80 fall away from buildings.
Uneven depth: Varying sub-base thickness creates weak spots. Maintain consistent depth across the entire area.
Compacting when too wet: Saturated material doesn’t compact properly. Wait for slightly drier conditions or add drainage before proceeding.
Not checking levels: Assuming the ground is level causes problems later. Use a spirit level throughout preparation.
Getting the patio sub-base right transforms how long your outdoor space lasts. Poor preparation leads to cracking, sinking, and expensive repairs within years. Finescape Landscaping & Paving Ltd handles this preparation with the precision it deserves, ensuring your patio remains solid and level. We manage every stage, from excavation and material selection through to final compaction and drainage, so your patio becomes a lasting investment. Contact us today to discuss your patio project and let our team handle the groundwork properly.
Frequently Asked Questions
How deep should a patio sub-base be?
Most residential patios require a sub-base depth of 100-150 mm, depending on soil conditions and patio size. Heavier use areas or clay soils may need 150-200 mm. Always check your specific soil type and local ground conditions; poor drainage soils need greater depth. Professional installers assess ground bearing capacity to determine the exact depth needed for your patio sub-base to prevent settling and cracking.
What is the best material for a patio sub-base?
MOT Type 1 is the industry standard for patios. It’s a well-graded mixture of stone, gravel and dust that compacts firmly and provides excellent drainage. It’s durable, cost-effective and widely available. Ensure material is clean and free from organic matter. Some projects use Type 1 with a sand layer on top for additional stability. Quality of material directly affects how well your patio sub-base performs long-term.
How do you stop a patio sub-base from sinking?
Prevent sinking by properly preparing ground, using quality MOT Type 1 material, compacting thoroughly in 50 mm layers, and ensuring adequate drainage with correct fall. Remove all soft material and vegetation before laying sub-base. Poor compaction is the main cause of settling; use a plate compactor on each layer. Proper patio sub-base depth appropriate to your soil type also prevents movement and subsidence over time.
Does a patio need a slope for drainage?
Yes, a patio sub-base fall is essential. A slope of 1:40 to 1:80 (25-12 mm per metre) directs water away from structures and prevents pooling. This gradient should be incorporated into your patio sub-base preparation and maintained through to the finished surface. Proper drainage prevents water damage, frost heave, and premature deterioration of both sub-base and paving materials.
